Sheds and outbuildings are hit so often by wild animal interlopers, it just makes perfect sense to make sure the building has been protected properly, even if you have not yet been privy to an infestation yourself. Skunks are just one part of a much larger problem across the United States, and every state or area has its own pest animals to worry about. When you're dealing with skunks, there's also likely to be other scavengers in the area — both predators and prey of the skunk. This could include foxes and opossums, rats and mice, coyotes, raccoons, and many more. By ensure that your shed is animal-proof, all of these animals — and the problems that come with them — are eliminated.
Step One: The Inspection
The first thing you need to do is actually work out what you're up against. Is it a skunk? Or could it be another animal? Skunk poop can easily be confused with the poop of other wild animals, and even domesticated animals, such as cats or small dogs. There are other signs that skunks leave behind, however, including paw prints and tail/body scuff marks, mounds of fur from scratching or play-fighting, urine, stains from fur-rubbing, food remnants, and patches of damage. The latter is usually a result of trying to get in or out of somewhere.
Step Two: A Plan
You'll need to come up with a plan. That should go without saying. Because of the unpredictable nature of skunks (and most other wild animals, too), you will need to not only have a plan, but also a backup plan, just in case the original plan doesn't work. In fact, seeing as we're talking about skunks and they're one of the most unpredictable pest animals you could come up against, it might even be worth coming up with a Plan C, as well as A and B.
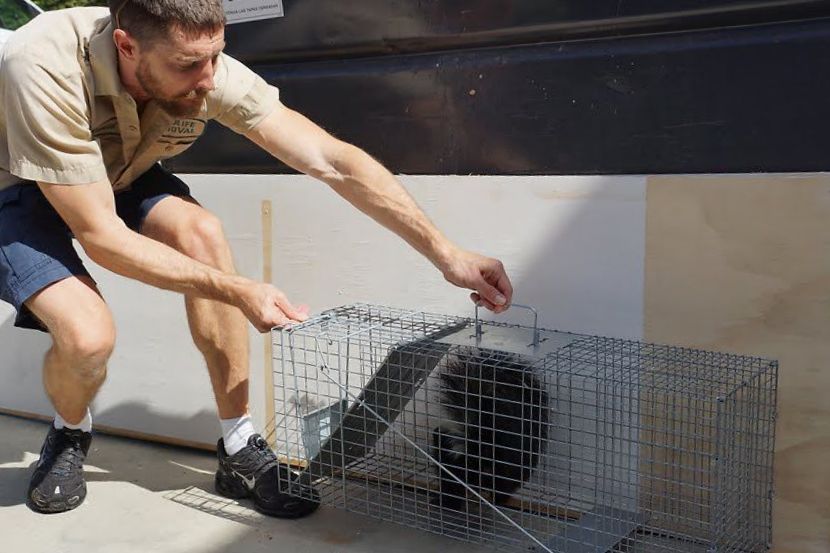
The plan will depend on you, the exact case, how many animals you're up against, and what resources are open to you. If you plan to DIY the skunk removal job, your plan B should be to call upon the assistance of a professional — a wildlife removal specialist. (There is a VERY high chance that you'll be calling on your Plan B if this is the first time you've ever tried to remove a skunk/pest animal from your home.)
Step Three: Covering All Bases
Before you can actually put your plan into action, you'll need to know whether or not it's right, humane, doable, and even legal. Poison, for example, is UNLAWFUL action against a skunk. There isn't a legally registered poison to use on skunks, and anything you use will be designed for another animal (such as rats), or a DIY mix that could then out your life in danger. Oh, and the lives of other animals, your family, and even your pets, too.
If you live in Indiana, you're only lawfully permitted to trap skunks at certain times of the year. You'll need to get a permit to trap a skunk if you live in Virginia. The restrictions are there to protect not only skunk populations, because we do actually need the animal around, but also other wildlife. The skunk might be a pest animal to you, but it's also a food item for others, and the animal is also a pest control operative. Skunks actually do help humans in some way, when they're not being a pest.
You will need to check the restrictions, rules and regulations for the state in which you live. Make sure that you're checking reputable websites only — government websites are a good place to start. There are a lot of blogs and sites out there that offer information and guidance, but some of that information is incorrect. Any website that actually offers poison as a solution for skunks is probably best avoided, as is a website that advises going against the law.
Step Four: Shopping Spree
There's a pretty good chance that you won't have everything you need in order to get rid of the skunk and then keep it away. Not having everything you need right away, to hand, is not a smart choice. Being super prepared, perhaps even over-prepared, is a much better approach.
You will need a number of protective items before you start, including gloves, eye protection, a face/breathing mask, and coveralls. You will also want to get some boot coveralls, too. Plenty of garbage bags are essential for getting rid of the contaminated stuff, which is everything the animal will have come in contact with. Cleaning equipment and products are also important; you'll need to clean up every bacterial shred left behind, even the bits you can't see, to ensure that you're not spreading potentially deadly diseases.
On top of all of this, you'll also need the materials to seal up the holes that the skunk used to gain entrance to the shed, or to repair any damage that the animal has caused. This is vital for ensuring that the animal can't and won't come back, and also other animals.
Step Five: A Plan in Motion
After all the planning and prepping, it's then time to actively start removing skunks and preventing their return. The approach you take will very much depend on the time of year, where you live (and the laws), and your personal preferences. If you decide to hire in a professional, this will be the time that traps are set or exclusion devices are installed, and the entire property is watched. As soon as the critters are removed, the shed or building must be sealed up and repaired, preventing reentry.
Step Six: Keep Up
Once you have removed your skunk, it's time to then put certain modifications or changes in place to make sure they can't come back, along the repair work you may have already done. In some cases, this could be as simple as installing a fence around the perimeter of your property. In other cases, it could be removing all food sources. The point is: you must make the modifications or changes and then keep up with them or maintain them. Letting things slide again is the fastest way to invite a skunk problem back to your yard.
Go back to the pestcontrolskunk.com home page.
Copyright 2021 - pestcontrolskunk.com
Nationwide Skunk Trapping & Removal